Tuesday, November 19, 2013

TWD -- A high maintenance cookie


Double chocolate cookies -- too thin for my taste.
Was it worth one pound of chocolate, a hard-to-work-with fudge like dough that refused to drop neatly from a cookie scoop and a cookie which stubbornly stuck to the cookie sheet? I vote no. The cookies were good but not THAT good. This cookie was high maintenance.

This cookie also required more time to make than, say, a typical chocolate chip cookie. I have recipes for chocolate cookies made with cocoa that I would rate higher than this one.

I rarely have cookies stick these days now that we have silicone and parchment paper. I first tried baking them on a silicone mat and they wanted to adhere to the silicone. I then tried parchment paper, as specified in the recipe, but with no better luck. And, the cookies tended to spread too much for my taste. I like a thicker, more substantial cookie.

The bottom line is that I won't make these cookies again -- too expensive, too hard to work with and too thin. Give me Martha Stewart's chocolate cookies any day.

Tuesday, November 5, 2013

TWD -- A great chance to experiment

Nine cups of flour for two loaves of bread? That was the first thing that struck me when I read through this week's Tuesdays with Dorie recipe: Pumpernickel Bread. I found the list of ingredients (chocolate, espresso, molasses, yogurt) intriguing, but the amount of flour indicated that if this recipe was made into two loaves they would be HUGE!! With only two people in my household, I decided that loaves that big would get stale long before they were eaten. Thus, I decided to make three loaves, not two, and give one to friends and freeze one for later.

That decided, I then realized this was a chance to experiment with three different baking techniques and see which one proved to be the best. I would shape all three as described in the recipe (I also watched the video which helped in the shaping) but would bake one in a stone covered baking pan (similar to a La Cloche, but long and narrow), bake one in a traditional 9 by 5 bread pan (I chose stone for this as well) and bake the third in the manner described in the recipe, directly on baking tiles using ice water to create steam. I was dying to try the kitchen towel sling for rising, so the third loaf would be treated exactly like the recipe specified.

I also decided to experiment with the rising instructions. Recipes of old called for three rises, but most modern ones require only two. Was the third rise really necessary? I decided to find out. Thus, the first two loaves were allowed to rise twice, and the third would rise three times, just as the recipe prescribed.

Unable to find prune lekvar in my area, I substituted seedless blackberry jam for the prune butter. I was fortunate to have stone-ground rye flour, purchased on a recent trip to Bear's Mill (bearsmill.com) in western Ohio. It's one of the few mills left in the state still grinding flour.  Aside from the lekvar substitution, I followed the recipe to a T. I soon learned that my Kitchen Aid mixer could not handle dough with nine cups of flour. The dough began crawling up the dough hook and beyond! This resulted in a major cleaning effort to coax the dough out of the mixing mechanism. Lesson learned: never try to mix three loaves of bread at once. I ended up taking the dough out of the mixer and finishing it by hand -- not the Herculean task as described in the recipe, but rather soul-satisfying after 10 minutes cleaning my Kitchen Aid of mud-colored globules of dough.

Loaves No. 1 and 2 in the oven
But once past that snag, I was off and running. Loaves one and two were shaped with one placed in the stone covered baker, the other positioned in the 9 by 5 loaf pan. I topped one with sesame seeds, the other with caraway seeds.

The towel technique
I then started work on loaf No. 3 -- the one by which I followed the recipe exactly (except of course for the blackberry jam). I let the loaf rise twice, then shaped it according to instructions.  I floured a kitchen dish towel and placed the loaf seam side up on the towel. I disliked the idea of poking a hole in the towel, as suggested, but discovered that the towel I chose had a piece of binding tape sewn diagonally across one of the top corners -- a device intended for hanging. Perfect. I shoved one end of the towel through the binding tape, then used the tape to hang the loaf from the knob on a kitchen cupboard.

After the requisite 40 minutes of rising, I turned the loaf onto a paddle sprinkled with cornmeal. I egg-washed the top, sprinkled on some seeds, slashed it and positioned it onto preheated baking tiles. I then threw in the ice water for steam and set the timer.

It turned out that I loved the kitchen towel-rising technique. It allowed me to achieve a fat boule without having the sides sag. I will definitely use this technique in the future. It was easy, foolproof and resulted in just the size loaf I wanted.

From left, stone covered baker, 9 by 5 bread pan, towel-rising loaf

So, which loaf tasted the best? I can honestly say I couldn't tell a difference. The mixture of ingredients was wonderful. The crispiest crust, however, was accomplished with the 9 by 5 pan, something I never would have predicted. The shape I liked the best was the one created by the kitchen towel. The least successful was the loaf made in the (expensive) covered stone baker. So, if anyone out there is contemplating purchasing such an item, I would advise against it. I have not found that it's worth the money. A kitchen towel is much, much cheaper.


Tuesday, October 15, 2013

TWD -- Danish, well worth the effort!

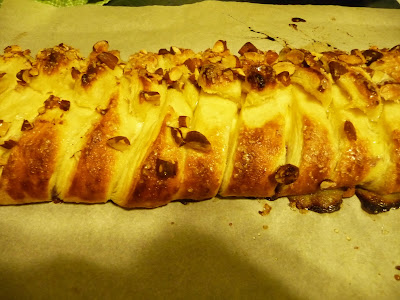
Were all the laborious steps required to make this week's Tuesdays with Dorie assignment, Danish, worth the effort? Yes! The end result was delicious. Things got off to a bad start, however.

Boiled-over berries
I chose to use the berry filling, mainly because we grow blueberries and raspberries in our backyard, and we had bags of both in the freezer. I followed the directions in the recipe, using the microwave to boil the berries and sugar. Things were fine after the first 10 minutes. But during the second cooking required, I opened the microwave door to a mess of boiled-over berries.

After scraping the mixture back into the bowl, I proceeded to make the cream mixture, but this time avoiding the microwave and thickening the ingredients on top of the stove.  No problems there. I chose to use half-and-half rather than heavy cream. I next moved on to the dough, using the food processor as suggested.

Putting the berry filling down the middle
After refrigerating the dough for a day, I then attempted the rolling and folding technique. Here was where I had a question. Since the recipe called for half the dough, did the measurements for rolling and folding apply to the whole batch of dough, not just the half? I reasoned that it did, so I made my dough measurements smaller than the instructions stated.

Browning after 15 minutes at 400 degrees
After rolling the dough for the final time after the 30-minute refrigeration, the rest of the Danish was fun and easy. I used all the berries and all the cream and folded the angled ends over the dough with wild abandon. I was nearing the end!! I then applied the egg wash, sprinkled on the almonds, then applied a second coating of egg wash. I picked this tip up at the bakery where I volunteer. If a bread calls for nuts or seeds, we egg wash twice, once before applying the topping, then afterward. That way the topping is sure to stick. I also had some sparkling sugar that I applied with a rather liberal hand.

I thought the baking temperature seemed high, 400, but I baked the Danish at that temp for 15 minutes. By then is was really beginning to brown.

A chose to take my Danish to the bakery, so my fellow volunteers could try it. They all loved it. It was a big hit! I knew I couldn't go wrong with a Beatrice Okajankas recipe. I own two of her books and use one of them almost every week. Thank you Beatrice for a wonderful recipe!


Tuesday, September 17, 2013

TWD -- Expresso Profiteroles without the Profiteroles

Espresso Profiteroles without the Profiteroles
After reading the recipe for the Espresso Profiteroles for this week's Baking with Julia assignment, I decided to do two-thirds of the recipe and leave off the cream puffs. I had been wanting to try custard-based ice cream in my new Cuisinart ice cream maker, and the chocolate sauce sounded good after reading the ingredient list. I couldn't picture my husband and I eating all those profiteroles, but I could see us devouring the ice cream and chocolate sauce.

I doubled the ice cream recipe and I'm glad I did. Otherwise, I would have had way too much sauce. I thought the ice cream was wonderful, although I'll admit I upped the sugar a little bit. Unfortunately, we can't buy vanilla beans in our small town, so I made do by putting two teaspoons of vanilla ice cream in the mix. I wish I had added more.

The sauce was good but grainy. I'm not sure what I did wrong. Once it had cooled, I tried reheating it in the microwave, but found this method unsatisfactory. My best results were when I reheated the mixture in a double boiler. I would make the ice cream again, but I'm not sure about the sauce.

Monday, August 19, 2013

Johnny Cake Cobbler: Green around the gills

Green goo in amongst the cobbler
We've all heard of green eggs and ham. But a green around the gills fruit cobbler? I don't think so. I will be curious to see if other Tuesdays with Dorie bakers saw their Johnny Cake Cobbler turn green shortly after it was out of the oven.

That's not to say it wasn't good. It was. At least the first day. When it was first removed from the oven (I chose to make it in a 10-inch deep dish pie plate), it looked fine.  As it sat on the counter, however, it began to turn green. I thus
Just out of the oven, before the green set in
I decided to shove the leftovers in the refrigerator, hoping to keep the greenish color at bay. But, after refrigeration and even after warming in the microwave, it wasn't as good the second day. I've decided it's best eaten the day it's made. And I would hesitate serving it to guests. I think the greenish color would turn off just about everyone.

My guess is that the plums are the culprit. I have used nectarines before in desserts and never found they turned the end results green. So I'm blaming the plums. I'm curious to see if anyone else had this experience. Would I make this again? No. My favorite cobbler, bar none, is the peach cobbler I once had at a potluck and later found on Allrecipes.com. It's called Peach Cobbler 1.It's made with white bread rather than a biscuit-like dough. This cobbler is to die for.

Monday, August 5, 2013

TWD -- Loved the sauce, disliked the crust

I was curious to try Eastern Mediterranean Pizza since I love to experiment with different crust recipes. Since this was a pita bread used as a crust, I wondered how I would like it. In short, I didn't. I like my pizza crusts to be snappier, to brown better (sugar helps here) and to be less chewy. My favorite crust is by Rose Levy Beranbaum from her book "The Bread Bible."

Dough after additional flour added
I made a half-crust recipe as suggested, but found I needed the maximum amount of flour, and then some. Even then, the dough was a bit wet.

Because of the sponge and the long rise, the dough was rather difficult to roll/stretch out. It kept bouncing back. Part of my problem could have been the fact that I used bread flour instead of the all-purpose flour as suggested. I was out of AP flour and didn't want to run to the store to get more. Therefore, the bread flour, I'm sure, made for a chewier crust.

That said, I loved the topping. We grow our own Roma tomatoes, and it was nice to find a recipe that has one use the tomatoes as is, without breaking them down in a long-simmering sauce. The combination of lamb, tomatoes, shallots, garlic, cinnamon and allspice was wonderful. I wouldn't have changed a thing. Incidentally, I used twice the amount of sauce called for in the recipe. I could tell by reading the ingredient list that this would be a bit skimpy for eight individual pizzas.
Mediterranean pizza after baking

If I do this again, I would use Rose's recipe for a crust and double the sauce ingredients as described above.

Tuesday, July 16, 2013

TWD -- A Half-sized Tart

A half-sized tart made with a pastry crust
What do you do when a recipe calls for phyllo dough and there is none to be had in the small town in which you live? Substitute. So my Summer Vegetable Tart was made with pastry dough, a supply of which I always keep in my freezer. And a 9" tart seemed awfully big for two people when the recipe appears to be one that needs to be eaten soon after it was made, not days later in the form of leftovers.

So I opted for a 7" tart instead and by cutting the recipe in half, everything worked out just fine. I followed the recipe exactly, but added a bit more thyme. I figured the small amount called for in the recipe once cut in half would be minuscule.

I started by blind-baking my crust, using dried beans as my pie weights. I keep a parcel of dried beans wrapped in foil on my baking shelf and use the same dried beans every time I need to blind bake.
Pie crust pricked with a fork
Using dried beans as pie weights
After letting the crust cool, I sauteed the vegetables, added the goat cheese and scooped the mixture into the cooled crust. I let the mixture cool to room temperature, then cut the tart into wedges and tried it -- delicious. I will definitely make this again, but experiment
with other vegetables. Like everyone else in my area of Ohio, I have a wealth of zucchini right now. I think I will cut back a little on the red pepper, keep the mushrooms and onion and add a handful of sliced zucchini.